What is S/MIME? How does it work?

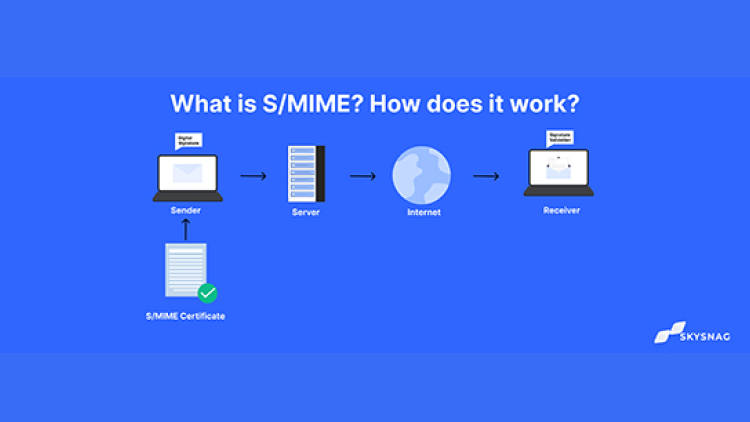
An email pauses at numerous servers and routers as it travels over the internet. It’s possible that at any of these points, scammers may intercept the message leading, for instance, to the theft of login information or the redirection of traffic to a phishing URL. This man-in-the-middle (MitM) attacks can be prevented by using S/MIME and digital signatures, despite the fact that they are difficult to spot.
This article will discuss what S/MIME is, how it functions, and why you should use it. Let’s dive right in.
What is S/MIME?
Secure/Multipurpose Internet Mail Extension (S/MIME) is an industry-standard for email encryption and signing that is commonly used by organizations to improve email security. The majority of enterprise email clients support S/MIME.
Simply said, S/MIME uses digital signatures and encryption to verify the validity of emails and to ensure that the content has not been altered in any way.
How does S/MIME work?
S/MIME is based on asymmetric encryption. This implies that using a set of keys to encrypt and decrypt an email is necessary.
When an email is sent, it is encrypted and decoded using the recipient’s private key and the sender’s public key, respectively. S/MIME additionally adds a digital signature to an email. This ensures that the sender has authorization to send emails from a particular domain.
S/MIME certificate
Installing a S/MIME certificate, commonly referred to as a “client certificate,” is necessary to implement S/MIME. They perform tasks that are quite similar to those associated with SSL certificates as they work on the public key infrastructure principles. Let’s find out how the S/MIME certificate works below:
How to Use a S/MIME Certificate to Digitally Sign Emails in Outlook
Step 1: Install your certificate on Outlook
Step 2: Select the file and navigate to the Options.
Step 3: The Outlook Options window will appear. From the menu on the left, select Trust Center. Activate Trust Center Settings.

Step 4: Search for the Email Security tab. Read each of the four choices under the Encrypted Mail section in detail. You must choose to Add digital signature to outgoing communications from among them to include the signature in every email you send.

Step 5: Select, OK.
Your emails will now all automatically include the digital signature when you send them. The tiny ribbon icon on the email, as seen in the screenshot below, stands in for your digital signature. The receivers can view a security dialogue verifying your identity by clicking on it.

Conclusion
Skysnag’s automated software safeguards your email communications from direct domain phishing attacks. Our automated software is easy to use and increases email deliverability.
By ensuring that only emails from approved senders are authenticated. Sign up using this link for a free trial today.


