How to Set Up DKIM for Crisp?

DKIM is specified in RFC 6376, and it is used by a number of email service providers, including Google, Yahoo, and Microsoft. DKIM is designed to address some of the flaws in the existing email system, such as spoofing, phishing, and message tampering. It allows email senders to digitally sign their messages in a way that can be verified by email receivers. This allows receivers to verify that the message truly came from the sender, and has not been tampered with.
Steps to Configure A custom domain for Crisp
Head over to the Crisp Dashboard:
- Login in to Crisp.
- Select Settings > “Website Settings Choose your website from the list.
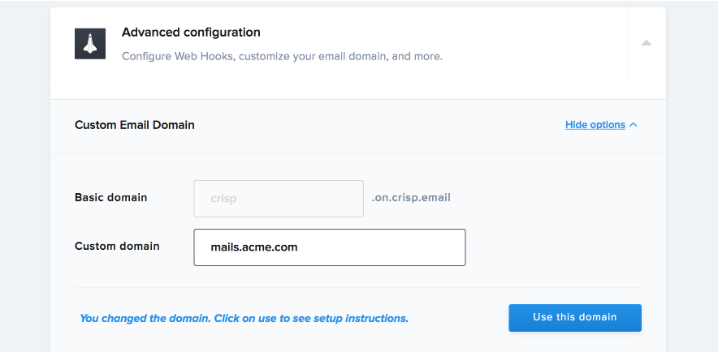
- Select Custom Email Domain after opening Advanced setup by scrolling down.
- Enter your preferred Custom Email Domain in the section that asks for the domain (eg. mail.greenlight.com)
- When you select “Use this domain,” instructions will appear.
- Don’t click “verify” just yet.
- Use your DNS Manager to connect (Cloudflare, Namecheap, …)
- Add each of the Crisp-provided DNS records one by one. (Includes SPF/DKIM)
- Click the Verify domain configuration button now. Crisp will check your DNS records to make sure they’re configured correctly. This could take 20 seconds.
- The domain change will either be accepted or rejected by Crisp. Verify that all records have been added to your DNS management if it rejects the modifications.
- This record should be published in the DNS records section for the relevant domain.

- To utilize this domain, enter your custom email address and click.

When creating DNS records, be careful to add them to your DNS management.
You can use Skysnag’s free DKIM Checker to check the health of your DKIM record here
Enable DMARC for your domains to protect against spoofing. Sign up for a free trial today!
For more information on Crisp DKIM setup, you can refer to their reference documentation


